The Foundations of Computer Numerical Control
What exactly is CNC Machining? To understand the future, we have to look at the name. It stands for Computer Numerical Control. In the old days, a machinist was like a master carpenter. They used their hands, their eyes, and their years of experience to turn a metal part on a lathe. If they had a bad morning or their hand slipped, the part was ruined. CNC changed everything by putting the “skill” into a computer script.
The Digital Script: How Robots “Think”
A CNC machine is essentially a high-powered robot that follows a mathematical recipe. It takes digital coordinates (numbers) and translates them into physical movement. This eliminates the “human factor” of fatigue and error. Once a program is perfected, the machine can make ten parts or ten thousand parts, and every single one will be exactly the same. This Repeatability is the primary reason why CNC is the gold standard for industries like aerospace, where “close enough” can lead to disaster.
Subtractive vs. Additive: Choosing Your Weapon
Many people ask, “Why use CNC when I can just 3D print it?” It’s a great question. The answer lies in the material. 3D printing is additive—it builds things by adding material. This often leaves microscopic gaps or weak spots between layers. CNC is subtractive. It starts with a solid, forged block of material. Because the block is already solid and strong, the resulting part is much more durable. Think of a 3D-printed part like a Lego wall and a CNC part like a solid brick. For functional parts that need to hold high pressure or high heat, CNC is the undisputed winner.
The Anatomy of Precision
Inside every machine center, there is a complex dance of components. To be an effective designer, you need to understand three key parts:
- The Spindle: This holds the cutting tool. It can spin at speeds up to 30,000 RPM. That’s five times faster than a race car engine!
- The Ways: These are the tracks the machine moves on. They are precision-ground and lubricated with oil to ensure the movement is as smooth as silk.
- The Controller: This is the computer that reads your code and talks to the motors. It’s the “Brain” of the operation.
The Lifecycle of a CNC Part: From CAD to Reality
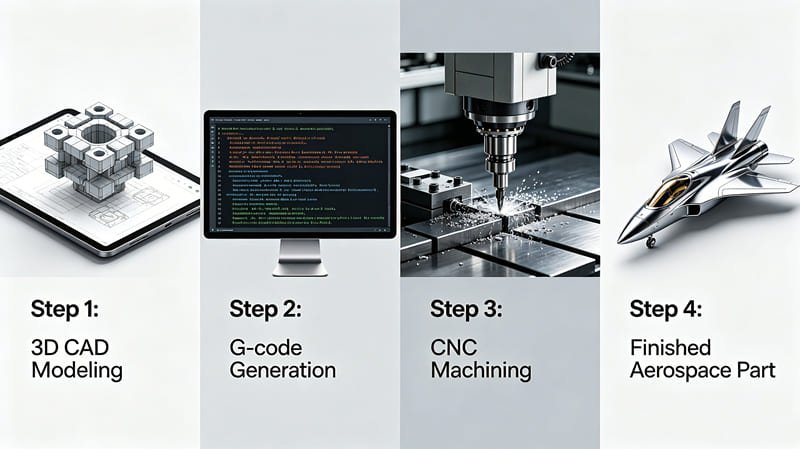
Turning an idea into a part isn’t a one-click process. It’s a series of translations. If you’ve ever used a translator app, you know that words can get “lost in translation.” In manufacturing, a lost translation means a broken tool or a ruined part. Let’s look at the four critical stages of this journey.
Stage 1: Designing with Intent (CAD)
You start in CAD (Computer-Aided Design). But here is the secret: you aren’t just drawing a shape; you are designing a process. A rookie designer draws a part that looks cool. A pro designer draws a part that is easy to clamp and easy to reach with a tool. For example, if you design a part with a tiny hole that is 10 inches deep, you’ve created a nightmare. There isn’t a drill bit in the world that is thin and stiff enough to do that. This stage is where Design for Manufacturing (DFM) begins.
Stage 2: The Digital Translation (CAM)
Once your CAD model is done, you move to CAM (Computer-Aided Manufacturing). This is where you tell the machine how to cut the part. You choose the path, the tools, and the speed.
Imagine you are mowing a lawn. You could go in circles, or back and forth. CAM software helps the engineer choose the most efficient path to save time and tool life.
The output of this stage is G-code, the universal language of CNC machines.
Stage 3: The Setup: Finding “Truth”
Setup is where the virtual world meets the physical world. The machinist must secure the material into the machine. This is harder than it sounds. If the part vibrates by even 0.01mm, the finish will be ruined. We use Workholding devices like hydraulic vises and custom fixtures. Once clamped, we must locate the Work Coordinate System (WCS). We tell the machine, “This specific corner is (0,0,0).” This is the most dangerous part of the job—if this is wrong, the machine will think the metal is in a different place and will crash at full speed.
Stage 4: Machining and Measurement
The machine runs. Coolant (a mix of oil and water) sprays onto the tool to prevent the metal from melting. After the machine stops, the job isn’t over. We use CMM (Coordinate Measuring Machines) to check the work. A CMM uses a ruby-tipped probe to touch the part in hundreds of places, creating a digital report that proves the part is within the customer’s Tolerance requirements.
| Linear Dimension Range (mm) | Fine (F) Tolerance | Medium (M) Tolerance | Coarse (C) Tolerance | Very Coarse (V) |
|---|---|---|---|---|
| 0.5 to 3 | ±0.05 | ±0.1 | ±0.2 | – |
| 3 to 6 | ±0.05 | ±0.1 | ±0.3 | ±0.5 |
| 30 to 120 | ±0.15 | ±0.3 | ±0.8 | ±1.5 |
| 400 to 1000 | ±0.3 | ±0.8 | ±2.0 | ±4.0 |
The Machine Arsenal: Mills, Lathes, and 5-Axis Ninjas

Just as a chef has different knives for fish, bread, and vegetables, a manufacturer has different machines for different geometries. If you use the wrong machine, you waste time and money. Let’s break down the “Big Three.”
CNC Milling: Prismatic Power
In a mill, the material stays still while the tool spins. Vertical Machining Centers (VMC) are the most common. The tool comes from the top. They are great for flat parts, like brackets, plates, or engine heads. Horizontal Machining Centers (HMC) are the big brothers. Because the tool comes from the side, the metal chips fall away instantly. This allows them to run much faster without the tool getting “clogged” by recycled chips.
CNC Turning: The Beauty of Symmetery
If your part is round, you need a Lathe. In a lathe, the material spins while the tool stays still. This allows for incredibly high surface finishes on cylindrical parts. Swiss Turning is the “Special Ops” of the lathe world. It’s used for parts that are very long and very thin (like medical pins). It supports the material so well that it can hold tolerances of ±0.002mm on a part the size of a toothpick.
5-Axis Machining: The Ultimate Freedom
A standard 3-axis machine can only see the top of the part. If you want to cut the sides, you have to stop and move the part. This takes time. A 5-Axis Machine adds two rotational axes.
Imagine holding a part in your hand and rotating it while a fixed drill hits every side. That is 5-axis. It allows for “Organic” shapes found in human implants and high-performance impellers.
While the machine time is more expensive, you often save money because you only have to set the part up once, which eliminates hours of manual labor.
EDM: Machining the “Impossible”
Sometimes the metal is too hard to cut. For example, a drill bit will just snap if you try to drill into hardened armor plate. That’s when we use Electrical Discharge Machining (EDM). It uses electricity to erode the metal. Wire EDM uses a thin brass wire that acts like a microscopic saw. It can cut shapes with zero physical force, meaning the part won’t warp or bend from the pressure of a tool. It is the only way to get a perfectly sharp internal corner in a steel block.
Material Science: Choosing the Right Block
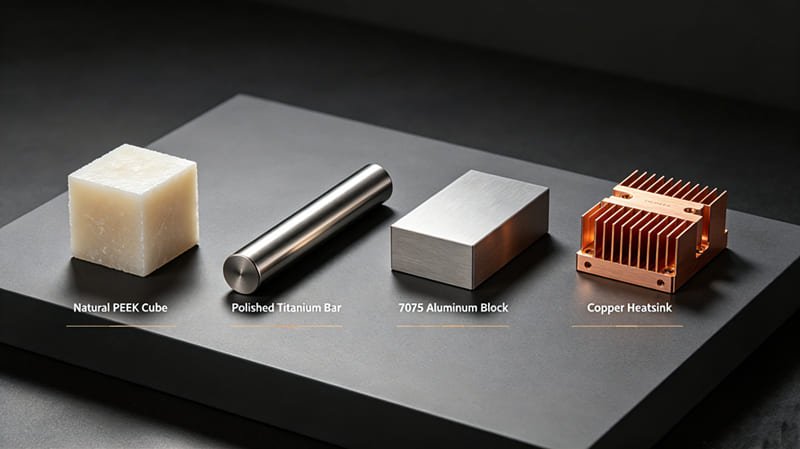
Your choice of material is the single most important decision in your project. It determines the weight, the strength, and 60% of the total cost. In CNC, we don’t just care about how strong the material is; we care about its Machinability—how easy it is to cut.
The Metals: Strength and Conductivty
- Aluminum 6061: The “Everyday Hero.” It is the most common material in the shop. It’s light, cheap, and very easy to anodize. If your part doesn’t need to survive a war or extreme heat, use 6061.
- Aluminum 7075: The “Aerospace King.” This alloy is nearly as strong as some steels but remains incredibly light. It’s used in high-stress drone frames and aircraft parts. It’s harder to cut than 6061, so expect a slightly higher price.
- Stainless Steel 316L: The “Survivor.” It contains molybdenum, which stops it from rusting in salt water or chemicals. It’s the standard for medical tools and marine hardware. It is tough and generates a lot of heat during cutting, which requires slower speeds.
- Titanium Grade 5: The “Legend.” It is as strong as steel but 45% lighter. It is also biocompatible, so your body won’t attack it. However, titanium is “gummy”—it sticks to the tools and can actually catch fire if the machinist isn’t careful!
The High-Performance Plastics
- PEEK: The “Metal Killer.” PEEK is a plastic that is as stiff as some soft metals. It can handle 250°C heat and chemical baths. It’s used in satellites and surgical robots. It’s very expensive, but for high-tech apps, it’s worth every penny.
- Delrin (POM): The “Slippery Master.” Delrin is self-lubricating. If you are making gears or bushings that need to rub against each other, Delrin is the best choice. It machines to a beautiful, glass-like finish.
- Ultem (PEI): The “Amber Specialist.” Ultem is clear, amber-colored, and incredibly strong under stress. It’s a favorite in the aerospace industry for interior lighting and electrical connectors.
| Material Grade | Strength (Tensile) | Machinability | Typical Environment |
|---|---|---|---|
| Aluminum 6061-T6 | 310 MPa | 10/10 | Indoor/Outdoor Brackets |
| Stainless Steel 304 | 515 MPa | 4/10 | Food/Kitchen Equipment |
| Titanium Grade 5 | 950 MPa | 2/10 | Aerospace/Medical Implants |
| PEEK Plastic | 100 MPa | 8/10 | Chemical Labs/Surgery |
| Brass C360 | 340 MPa | 10/10 | Electrical/Decorative |
Design for Success: The Unwritten Rules of DFM
 Professional engineers useDFM (Design for Manufacturing) to make their parts better and cheaper. If you ignore these rules, you will receive an “un-machineable” report from the shop. Let’s learn the four pillars of DFM.
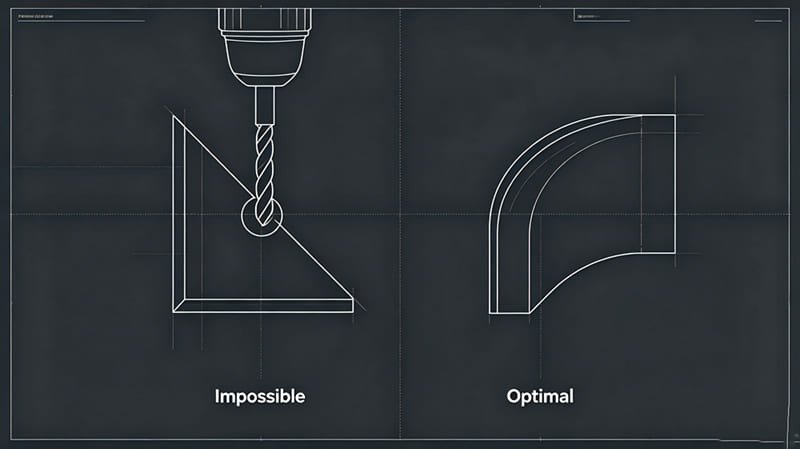
Pillar 1: The Radius Rule
CNC tools are round and spin. This is a law of nature. If you design a deep square pocket, the tool cannot reach the corners. You must add a Fillet.
Pro Tip: Make your corner radius 10% larger than the tool’s radius. If the tool is 10mm wide, make your corner radius 5.5mm. This prevents the tool from “choking” in the corner, giving you a much smoother finish.
Pillar 2: The 4:1 Depth Ratio
Tools are like long pencils. If they are too long and thin, they bend. This bending is called Deflection. It causes the part to be the wrong size and creates a loud, screeching noise called “chatter.” Always try to keep the depth of a pocket less than 4 times its width. If you need a deeper hole, the price will go up because the machinist has to go very, very slowly to keep the tool from snapping.
Pillar 3: Wall Thickness and Stiffness
Imagine trying to cut a piece of paper with a chainsaw. The paper would just blow away. The same thing happens with thin metal walls. For aluminum, never go below 0.8mm. For plastics, stay above 1.5mm. If the wall is too thin, the pressure of the tool will warp the metal, and your part will come out looking like a potato chip instead of a flat bracket.
Pillar 4: Standardized Holes
Machinists have a drawer full of standard drill bits (like 5mm, 10mm, 1/4 inch). If you design a hole that is 7.342mm wide, they have to use a milling tool to “draw” the circle, which takes ten times longer than just drilling it. Save yourself money by using standard sizes for all your holes and threads.
The Final Touch: Surface Finishes and Aesthetics
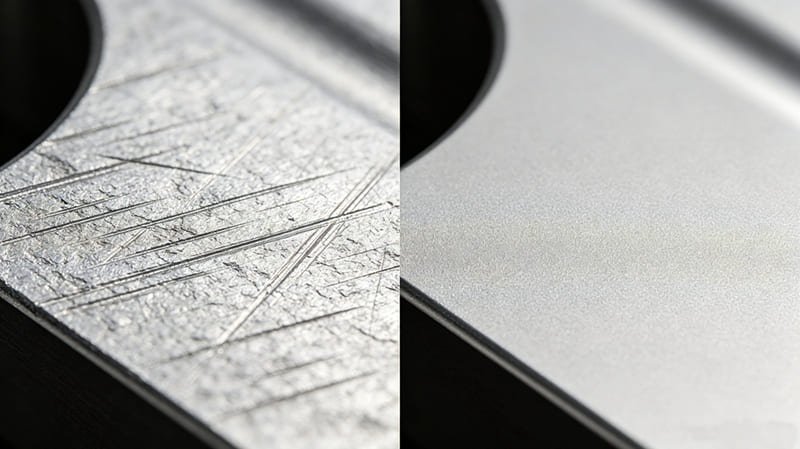
A part isn’t finished until the surface meets the requirement. “As-Machined” parts have tool marks—swirls and lines left by the cutter. While these look cool and “industrial,” they aren’t always functional. Here is how we make parts “Shelf-Ready.”
Visual Perfection: Aesthetic Finishes
- Bead Blasting: We shoot tiny glass beads at the part at high pressure. This removes tool marks and leaves a uniform, matte “satin” finish. It’s how the back of an iPhone or a MacBook is made.
- Anodizing (Type II): This is the “Magic Bath.” We use electricity and chemicals to grow a hard layer on the surface of aluminum. We can then add dye to turn the part any color—Red, Gold, Blue, or Black. The color is part of the metal, so it won’t peel off like paint.
- Polishing: For parts that need to be shiny (like a mirror) or clear (like a lens), we use manual buffing or vapor polishing. We can turn a frosted piece of acrylic into a crystal-clear lens in minutes.
Engineered Protection: Functional Finishes
- Hardcoat Anodizing (Type III): This is the “Armor.” It is much thicker than regular anodizing. It makes the surface of the aluminum as hard as a diamond. It’s used for parts that rub together and need to resist wear for years.
- Passivation: For stainless steel, this is critical. It removes iron particles from the surface, creating a “passive” layer that prevents the part from ever rusting, even in medical sterilization chambers.
- Black Oxide: A cheap and effective way to turn steel parts black and prevent mild rust. It’s common for tools and engine components.
The Economics of CNC: Cutting Costs, Not Corners

In manufacturing, time equals money. The machine doesn’t care how “cool” your part is; it only cares how long it takes to cut. If you want to keep your project on budget, you need to “design for the clock.” Here are three ways to save 50% or more on your next order.
1. The Setup Penalty: Order in Bulk
The most expensive part of CNC is the first part. Why? Because a human machinist has to spend 2-4 hours writing the program, loading the tools, and testing the setup. This is a Fixed Cost. If you buy one part, you pay for the whole setup. If you buy 100 parts, that cost is split between them.
Example: A part might cost $300 for 1 piece, but only $15 per piece if you order 100. Always try to order your expected “annual volume” at once.
2. Reduce Orientations: Keep it Simple
Every time a machinist has to stop the machine, open the door, and flip your part by hand, the cost goes up. If you design a part that has holes on all six sides, that’s six different setups. Try to design your part so all the features can be reached from just one or two sides. If you can’t, consider splitting the part into two pieces and bolting them together. Often, the cost of the bolts is far less than the cost of the extra machine time.
3. Choose the “Lowest Hero” Material
Don’t use Stainless Steel if Aluminum will work. Aluminum 6061 is 4 times faster to cut than Stainless 316. By choosing the wrong material, you are essentially paying for three extra hours of machine rental that you didn’t need. Only choose expensive, hard materials (like Titanium or Inconel) when the environment absolutely demands it.
Real-World Applications: CNC in the Wild
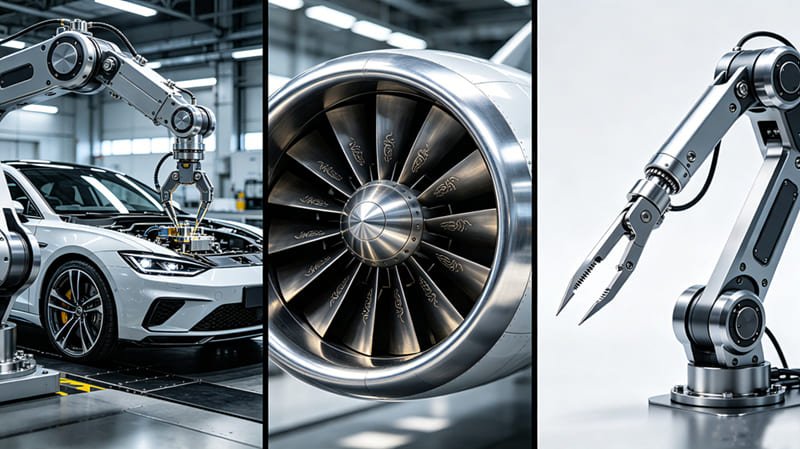
CNC isn’t just about making “widgets.” It is the invisible infrastructure of our lives. From the car you drive to the phone you are holding, CNC parts are the silent heroes keeping everything together.
The Aerospace Challenge
In the air, there is zero room for failure. Parts must handle extreme vibration and temperature changes from -50°C to +200°C. Aircraft manufacturers use CNC to carve “unibody” wing spars and engine mounts. Because the parts are cut from a solid block, they don’t have “seams” or “welds” that could crack under stress. This makes them the safest components in the sky.
The Medical Revolution
Modern surgery is now performed by robots controlled by doctors. These robots use tiny, micro-machined gears made of Stainless 316L or Titanium. They are so small they can fit through an incision the size of a pea. Also, CNC-machined PEEK implants are used to replace portions of the human skull or spine. Because the computer can follow a patient’s CT scan, the part fits their body perfectly.
Robotics and Automation
The “arms” of the robots in Amazon warehouses or Tesla factories are all CNC-machined. They need to be incredibly light so they can move fast, but incredibly stiff so they can stop at the exact same millimeter every time. We use Aluminum 7075 to achieve this balance of speed and strength.
The Future of CNC: IoT and Industry 4.0

We are currently entering the era of Industry 4.0. In the past, the machinist would listen to the sound of the machine to hear if something was wrong. Today, the machine “listens” to itself.
Smart Sensors and IoT
Modern CNC centers are packed with hundreds of sensors. They monitor everything from spindle vibration to the electricity used by the motors. If the machine feels a tool getting dull, it can automatically adjust the feed rate to prevent a bad finish. This “Predictive Maintenance” means we can stop problems before they even happen, which means your parts are cheaper and more reliable.
The Power of the Digital Twin
One of the most exciting trends is the Digital Twin. We create a perfect 3D copy of the machine on our computers. We can run the entire machining process in the virtual world to calculate exactly how much material we will use and how long it will take. This allows us to give you a quote in minutes, not days. At RapidAPlus, we are investing in these digital tools to make manufacturing as easy as ordering a pizza.
Common CNC Questions Answered
1. Is CNC machining better than 3D printing for functional parts?
Yes, for most engineering applications. While 3D printing is great for visual models, CNC uses solid blocks of real-world materials like titanium and steel. This makes the parts much stronger, more heat-resistant, and more accurate. If your part needs to fit into an assembly or survive stress, choose CNC.
2. How can I reduce the cost of my CNC machined parts?
The best ways to save money are: 1. Use standard material like Aluminum 6061. 2. Design with rounded internal corners. 3. Avoid deep, narrow holes. 4. Order more than 10 pieces to spread out the setup costs. Our free DFM review will help you find these savings automatically.
3. What file formats do I need for a CNC quote?
We prefer 3D files like .STEP or .IGES. These are universal and work with all machines. However, you should always include a 2D PDF drawing to specify critical tolerances, threaded holes, and surface finishes that the 3D model doesn’t show.
4. Can you machine clear or transparent parts?
Absolutely. We machine clear materials like Acrylic (PMMA) or Polycarbonate. After machining, the parts look “frosted,” but we use a process called Vapor Polishing or manual buffing to make them optically clear and see-through again.
5. Is Chinese CNC machining reliable for precision industries?
Yes, provided you work with an ISO-certified shop. Top-tier factories in hubs like Zhongshan use the same high-end machines (like Brother, Fanuc, and DMG Mori) as Western shops. The secret is to find a partner who understands Western engineering standards and provides transparent QC reports.
6. What is the difference between a CNC mill and a CNC lathe?
It comes down to what spins. In a mill, the tool spins and moves around the stationary material (best for square parts). In a lathe, the material spins while the tool stays still (best for round parts like bolts and axles).
Closing Thoughts: The Precision Partnership
CNC machining is the ultimate bridge between a digital dream and a physical reality. It allows us to create the impossible—from tiny medical gears to massive aerospace frames—with a level of precision that ensures our modern world keeps turning smoothly. By mastering the basics of material selection, understanding the limits of the “round tool,” and designing with the clock in mind, you can unlock a level of innovation that few other processes can offer.
Manufacturing is not just about machines; it is about the partnership between the designer and the maker. At RapidaPlus, we don’t just “cut parts”—we solve engineering puzzles. We thrive on helping you navigate the complexities of supply chains, material science, and DFM. Whether you’re iteration on a first-generation prototype or ready to scale to high-volume production, we are here to ensure your vision is realized with Swiss-grade precision and world-class speed. The future of your project is waiting to be carved out of the block, and we are ready to build it with you.